Thursday, September 22, 2011

Downtown Abbotsford Car Show

The Downtown Abbotsford Car Show took place on Saturday, September 17th. There was a bit of rain early in the morning, then the sky's cleared and the crowd arrived.


Cap-it Hot Rod and Hank received First Choice Award
Hank want to thank the Abbotsford Car show sponsors and especially Unitex Sales Ltd for Picking the Cap-it Hot Rod from all the other cars for their first choice award.


The Blues Brothers arrived in the "Blues Mobile" and performed on the live stage.


It was a fun show, with great cars and good food and entertainment, right in the heart of the old downtown Abbotsford.

Thursday, September 15, 2011

Langley Good Times Cruise-In

On Saturday September 10th Cap-it took part in the re-organized Langley Good Times Cruise-In car show.
Tom , Chris and Darren from Cap-it International were on-hand to greet the public, and hand out a few catalogs.
A Great Time was had by all, and the event was awesome.


Detailed and ready for the show.

Cars streaming in to get a place in the show.

Crowds are starting to grow.

A great summers day, with lots of cool vehicles to view.

The end of a Great Day, cars & girls . . . what more can we ask for, see you next year.

Monday, August 22, 2011

PoCo Car Show, August 21st, 2011

PoCo Car Show 2011
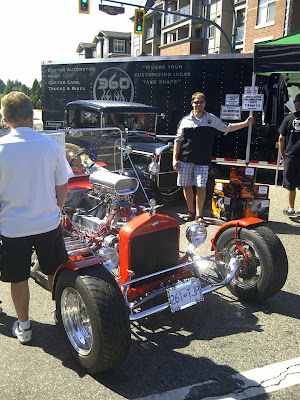
360 Fabrication invited Hank to display the Cap-it Ford T Bucket at their booth during the PoCo Car Show this weekend, Sunday 21.


It was a great and exciting show with approx 400 cars in attendance. Having the car show in the old part of town was awesome. The streets were filled with people as early as 9:30 in the morning till 5 in the evening.


Elaine enjoying the show.

JP Deschenes of 360 sends his appreciation via email, “I wanted to thank you and your wife again for taking time out of your busy schedule and coming out to join us at the car show yesterday. I think it is safe to say without your car we wouldn't have generated as much attention, and in all honesty after walking around it was easily the nicest car there”. Thanks JP

Tuesday, June 21, 2011

Kelowna Custom Car Show

June 12, 2011

We loaded up the Rod in our custom built trailer and headed to Kelowna for Boyd’s Father’s Day Charity Car Show.
As you can see it was a tight fit – we had Greg Cummings Trailer install some extra floor tie down mounts.


Cap-it’s booth at the annual Boyd Show and Shine located on Abbott St. in Central Park Kelowna BC
Approx 20,000 people attended the show.

ARB Roof Tent in background on Cap-it Jeep
The ARB roof top tent was a real hit, many people liked the fact that it’s located on top of your vehicles roof.


Hank couldn’t resist – he had Kelly from Kelly’s Kustom Pinstriping do some pinstripping on the cowl of the Hot Rod


Tuesday, May 24, 2011

Cap-it Hot Rod May Day Parade

Hank won 1st place in the Bradner May Day Parade on Victoria day, this was the first time out and it’s obviously a winner.
Hank & Mason spent the day marketing Cap-it at the event with the Rod and the Jeep. It looks like the Abbotsford store got the credit because they came in contact with many of their customers.

Bradner May Day Parade 2011 


The T Bucket ran and started beautifully the only problem has been that the steering wheel is to large, the left knee got in the way when applying the brake so the only thing to do is, get a smaller diameter steering wheel with a 2” dished out center. Another issue that came up was the C4 automatic Tranny shifting down relatively hard in 2nd gear - we think it may have to be adjusted. Didn’t sound good

Tuesday, May 3, 2011

Cap-it T-Bucket Update

We hope to have the Rod up and running in the next two weeks, just in time for the Bradner May-day Parade.

What’s on our still to do list?
  1. Finish the last of the wiring items such as master cylinder brake switch, coil wiring, battery terminal and turn signal switch
  2. Install main carb linkage and Kick-down transmission linkage to carburetor
  3. Speedo cable
  4. Rear Fenders
  5. Rear view mirror
  6. Install new chrome oil pan
  7. All fluids such as Antifreeze, Rear-end oil, Transmission fluid


We are all looking forward to the first time we start the engine, it will be quite the celebration especially if we don’t see any circuits shorting out. Although I personally enjoy 12 volt wiring, this has been quite the task. Despite the fact that this is a simple Rod I found out the there are many different ways in which to wire a vehicle.  The, “It’s a Snap” wiring kit should be called’ “It’s a Pain”. They should have at least given better wiring diagrams; many diagrams sections were missing such as the brake switch and turn signals. Because it’s a fiberglass body ground wires had to be routed and so we took special care in grounding the Rod. We took some good advice and ran a heavy ground wire from the battery which is located at the rear and ran it under the frame directly to the front of the Rod, then we ran a ground wire to the engine. Then we connected all lights, gauges and switches to that wire.
If you ever have a problem with 12 volt it will be because of the ground not being adequate or weak. In other words you can’t count on the frame to make a good connection as a ground. Some parts just need a good solid ground to work efficiently.

Monday, March 28, 2011

1923 T Bucket Update - The Body is On


The body is on


Installing the windshield - We ordered tinted safety glass for the windshield and side wind deflectors.

Pre fitting the fuel tank and battery case in the rear of the truck box

Installing the Windshield Support Rods - Because of the vertical windshield the wind resistance it will cause the 23 T Bucket calls for chrome support rods mounted to the frame. They must be the exact length before they will fit.


Installing the chrome radiator hose - this installation posed most difficult because the chrome copper Rad hose was just too short for us to place the chrome end caps on and fit it to the engine. But with 3-4 hours of study we managed to get it fitted. It doesn’t help when the Rad hose kit is missing critical parts.


Laying out the wiring harness - I’m using a wiring harness called, “It’s a Snap”
In my opinion the name, “It’s a Snap” wiring harness is misleading, it leads you to believe that it’s a snap to install when in fact it’s a pain in the back side. The company should have spent a little more time creating better instructions. 
The instructions began by saying that there are 3 bundles of wires, one bundle goes to the front of the vehicle, the second bundle goes to the rear of the vehicle and the third is for the interior. You’d think they could count; I looked at the harness and saw 4 bundles. It took me one hour to figure out what the forth bundle was for, and this was just the beginning. The wiring diagram was just as confusing, they did not show where the signal switch was, and they did not show how to wire up the brake switch and so on. By the way they have no internet site where you can go for help so I had to go to other sites to get the information.    
We did manage to get the rod wired.


Wiring the 6 gauges, light switch and ignition switch. 
Yes it looks a mess but it’s a well organized mess. 12V wiring has always been a pleasure for us and relatively easy to do.  The wires are coded so its easy to follow from one end to the other.


Fuel tank & Battery installed


We had to make up a special bracket to install the Solenoid


Installing the firewall and floor carpet


The carpet must be in before we can install the wiring harness. 


Placing the entire wiring harness
Let me tell you working under the dash of a 23 T Bucket is just about impossible. We did as much of the pre wiring as possible on the bench because we knew what we were in for. The T Bucket is just to small to crawl on ones back and let- alone having to soldering wires under those conditions.


Thursday, March 17, 2011

A Rolling Chassis

WOW, its coming together just fine! We’re on the home stretch. 

Months of hard work appear to be paying off and we’re seeing the benefits. I guess it reminds me of being a kid, assembling a glue together toy model. Its much the same feeling because you find it hard to lay down your tools and go home at the end of the day, you want to keep on going but you know you can’t, you’re delayed until other parts are installed first. As a kid the glue never dried fast enough for us.
I guess in the long run we all have the kid in us and I think it’s a good idea to keep it in as long as we can.


At this time we are going through the entire front-end, tightening all the bolts, setting the King Pins, shimming the King Pin bearings in preparation for the fender installation. Many special stainless bolts had to be ordered, sanded and then polished to a chrome finish. Our Fenders have to go on before the Rotors are installed.


Extra care is taken to install the freshly painted fenders. We are hoping that they will fit and align up as they did before taking them to paint.


Both fenders are now installed and it looks like we got the final fit and alignment right. 


The Headlight has been waiting a long time to be installed and now it’s resting on its chrome perch. It looks absolutely awesome.


We ran into a problem installing the wiring to the headlights. We couldn’t find a professional casing long enough to house the 5 wires going to the frame. After studying the issue we went out and purchased a stainless cable kit made for similar headlights. This new system caused us to drill a ½” hole in the backside of the light casing. The lights we have were designed for the wiring to exit through the bottom bolt that attaches everything to the headlight mount but the long mounting bolt caused problems as well. This new system actually looks great.  I know we did the right thing.


Its time to install those big boots, 15” X 31” – 18” wide Mickey Thompson tires. We’ve had them on and off so many times its nice to finally put them on permanently.

Installing the front tires

It’s a 20” Drive Shaft, custom made to order with a little silver paint just so it fits in with all the other running gear fittings.


Installing the self-adhesive fabric webbing to the frame. This webbing lies between the body and the frame and sort of acts as a cushion. Rather than mounting the body directly to the chassis and possibly creating friction we now have a squeak free  mount. It must be the way they did it in 1923


We’ve got ourselves a rolling chassis and it’s beginning to look like we’re on the home stretch. We’re not fooling ourselves; we know there’s a lot of hard work ahead of us but its sure feels good to get things to this stage.
Before we can install the body we need to attend to a few things that are still incomplete located on the frame - next on our to do list is:
  • Finish the Brake lines and bleed the brakes
  • Install the Emergency brake cables and cut them to length
  • Install the Speedo to Transmission gear attachment 
  • Install the Fuel line and Electric fuel pump that will be mounted at the rear
  • Route the heavy 8 gauge Battery cable that goes directly to the starter from the rear of the Rod – the battery will be located inside the truck bed


The bodies has been placed on the frame temporarily, we’ll be removing it for final frame wiring and finishing etc. Just wanted to show everyone how it looks.